

WordPressテーマ「Cocoon」のカスタマイズ備忘録です。
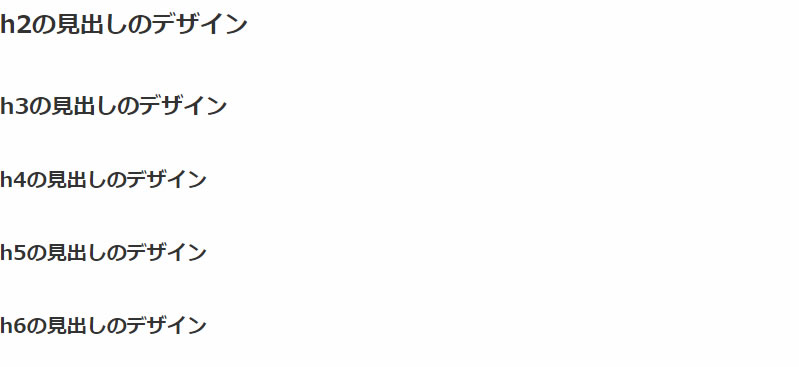
デフォルトのh2~h6のデザイン
Cocoonのデフォルトの見出しのデザインはこちら↓(サンプル画像)
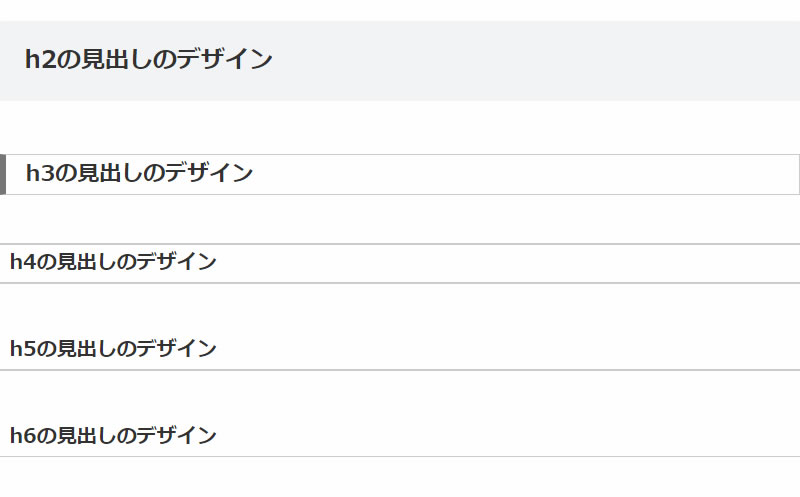
と~ってもシンプルです。
でも個人的にちょっとインパクトが弱いのでカスタマイズしていきたいと思います。
デフォルトのCSSの確認
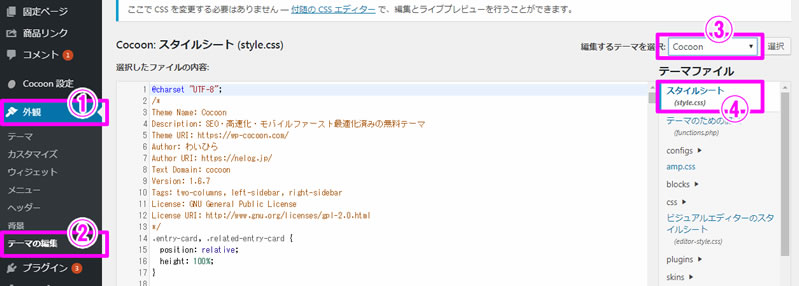
デフォルトのCSSは以下の場所で確認できます。
外観>テーマの編集>編集するテーマを選択:でCocconを選択>スタイルシート(style.css)
style.cssの中にデフォルトの見出し設定用のcssがありました。
ここでは確認だけで何も変更しません。
.article h1,
.article h2,
.article h3,
.article h4,
.article h5,
.article h6 {
line-height: 1.25;
font-weight: bold;
}
.article h2,
.article h3,
.article h4,
.article h5,
.article h6 {
margin: 2.4em 0 1em;
}
.article h4,
.article h5,
.article h6 {
font-size: 20px;
padding: 6px 10px;
}
.article h2 {
font-size: 24px;
padding: 25px;
background-color: #f3f4f5;
border-radius: 2px;
}
.article h3 {
border-left: 6px solid #777;
border-right: 1px solid #ccc;
border-top: 1px solid #ccc;
border-bottom: 1px solid #ccc;
font-size: 22px;
padding: 6px 20px;
}
.article h4 {
border-top: 2px solid #ccc;
border-bottom: 2px solid #ccc;
}
.article h5 {
border-bottom: 2px solid #ccc;
}
.article h6 {
border-bottom: 1px solid #ccc;
}
このデフォルトのcssを一旦リセットして好みのデザインにカスタマイズしたいと思います。
見出しのCSSのリセット
デザインCSSのカスタマイズは親テンプレートではなく子テーマのスタイルシートを修正します。
外観>テーマの編集>編集するテーマを選択:でCoccon Childを選択>スタイルシート(style.css)
にカスタマイズ用のCSSを設定しています。
/************************************
** 子テーマ用のスタイルを書く
************************************/
/*必要ならばここにコードを書く*/
の部分に…
今設定されているCSSを新しくカスタマイズするためにリセットします。
子テーマのスタイルシートにリセット用のCSSを追記します。
.article h2 {
    background: none;
    padding: 0;
}
.article h3 {
    border: none;
    padding: 0;
}
.article h4 {
    border: none;
    padding: 0;
}
.article h5 {
    border: none;
    padding: 0;
}
.article h6 {
    border: none;
    padding: 0;
}
今回はline-height (行の高さ)、font-weight(文字の太さ)、font-size(文字の大きさ)、margin(余白)はデフォルトのままにしました。必要に応じて変更して下さい。
リセットすると↓こんな感じになりました。(サンプル画像)
リセットができたので、あとは好きな見出しのデザインをリセット用のcssの下(後)に設定します。
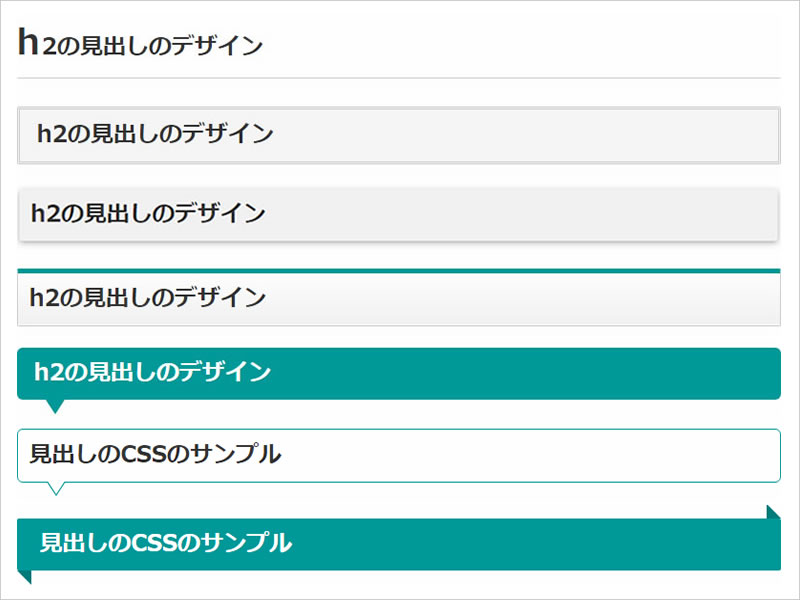
見出しのCSSのサンプル
今回はウェブで見つけたこちらのページを参考にさせて頂きました。
シンプルなHTMLとCSSコピペで実装できるタイトル(見出し)のデザインサンプル 50
シンプルな見出しCSSが50個!
実際に気になったh2の見出しデザインのサンプルを作成してカスタマイズしてみました。
1文字目を大きく&下線

↑サンプル(画像)↓追記したcssはこちら
.article h2 {
  padding-bottom: .5em;
  border-bottom: 1px solid #ccc;
}
.article h2:first-letter {
  margin-right: .05em;
  font-size: 1.5em;
}
2重線ボックス

↑サンプル(画像)↓追記したcssはこちら
.article h2{
  padding: .5em .5em;
  background-color: #ffff;
  border: 3px double #ccc;
}
ボックスシャドウ

↑サンプル(画像)↓追記したcssはこちら
.article h2 {
  padding: .5em .5em;
  background-color: #f2f2f2;
  box-shadow: 0 2px 6px rgba(0, 0, 0, .30);
}
上色線ボックス

↑サンプル(画像)↓追記したcssはこちら
.article h2{
  padding: .5em 0.5em;
  background: -webkit-linear-gradient(top, #fff 0%, #f2f2f2 100%);
  background: linear-gradient(to bottom, #fff 0%, #f2f2f2 100%);
  border: 1px solid #ccc;
  border-top: 5px solid #009999;
  box-shadow: 0 -1px 0 rgba(250, 250, 250, 1) inset;
}
噴出し

↑サンプル(画像)↓追記したcssはこちら
.article h2 {
  position: relative;
  padding: .5em .75em;
  background-color: #009999;
  border-radius: 6px;
  color:#FFFF;
}
.article h2::after {
  position: absolute;
  top: 100%;
  left: 30px;
  content: '';
  width: 0;
  height: 0;
  border: 10px solid transparent;
  border-top: 15px solid #009999;
}
噴出し(枠)

↑サンプル(画像)↓追記したcssはこちら
.article h2 {
  position: relative;
  padding: .5em .5em;
  background-color: #fff;
  border: 1px solid #009999;
  border-radius: 6px;
}
.article h2::before,
.article h2::after {
  position: absolute;
  top: 100%;
  left: 30px;
  content: '';
  height: 0;
  width: 0;
  border: 10px solid transparent;
}
.article h2::before {
  border-top: 15px solid #009999;
}
.article h2::after {
  margin-top: -2px;
  border-top: 15px solid #fff;
}
リボン

↑サンプル(画像)↓追記したcssはこちら
..article h2 {
  position: relative;
  padding: .5em 1em;
  background-color: #009999;
  color:#FFFF;
}
.article h2::before,
.article h2::after {
  content: '';
  position: absolute;
  border-style: solid;
  border-color: transparent;
}
.article h2::before {
  top: 100%;
  left: 0;
  border-width: 0 15px 15px 0;
  border-right-color: #007D7D;
}
.article h2::after {
  top: -15px;
  right: 0;
  border-style: solid;
  border-width: 0 15px 15px 0;
  border-bottom-color: #007D7D;
}
以上Cocoonの見出しのデザインを変更する方法でした。